Update, 2011-11-16: Added some troubleshooting info
There are many reasons why you would want to install ssh2 for PHP on your server, mine was to allow me to use SFTP on a WordPress installation because my web host does not allow the use of FTP. Even if your host allows FTP I strongly urge you to use SFTP instead, since it uses SSH to encrypt all your data transfers. FTP sends your username and password as plain text!
Requirements for this tutorial
- PHP 5.2.x (I have used this on 5.2.9)
- Apache
- LINUX (probably works on Windows too, but no details about that are described here, sorry)
- WordPress 3.0.1 (somewhat older versions should work too)
A general overview of ssh2 for PHP can be found at php.net. If you look at the requirements section on php.net you will see that two other libraries are required for this to work. They are OpenSSL and libssh2. I explain here how to install both of these as well.
Installing OpenSSL
First log in as root on your server on the command line and find out if OpenSSL is already installed by running the following command:
1
| |
If you see something similar to the two lines below (might differ in version numbers) then OpenSSL is installed and you can skip to the next section.
1 2 | |
If it is not installed, then you can do so by running yum or apt-get (depending on your system) as follows:
RedHat based systems
1
| |
Debian based systems
1
| |
Installing libssh2
You can verify if it is already on your system by searching for libssh2.so like this
1
| |
If it is not installed then you will have to install it from source.
Create a temporary directory to download the source files to and then cd to the newly created temporary directory
1 2 3 4 5 6 | |
Once these steps have been successfully completed delete the previously created directory.
Installing the ssh2 module for php
This is available via PECL and can be installed as follows
1
| |
This should have placed the ssh2.so file in your php extensions directory. Now add
1
| |
to your php.ini or whatever file your extensions are specified in. Depending on your installation this might be in a separate file instead of your php.ini. Consult you php installation documentation for more information. The way this is done varies depending on your distribution. Also worth mentioning is that you will need the zlib.so extension enabled as well. Make sure this is the case while you are editing the extension ini file and then restart apache.
Ubuntu/Debian
1
| |
Red Hat, CentOS, Fedora
1
| |
Now make sure that ssh2.so is really loaded by executing the following command on the command line:
1
| |
You should see something like
1
| |
If you do not, then the ssh2.so file might have been placed in the wrong directory or you did not correctly configure your ini file to load it.
Generating the ssh keys
Wordpress needs to know the location of your ssh public and private keys. This is how you generate them: On the command line on your server login as the user that has access to the site. In my case I have the site installed as a virtual host and have a specific user that owns it.
1 2 3 4 5 6 7 8 9 10 11 12 13 | |
Create an “authorized_keys” file by copying the public key in place
1 2 3 4 5 | |
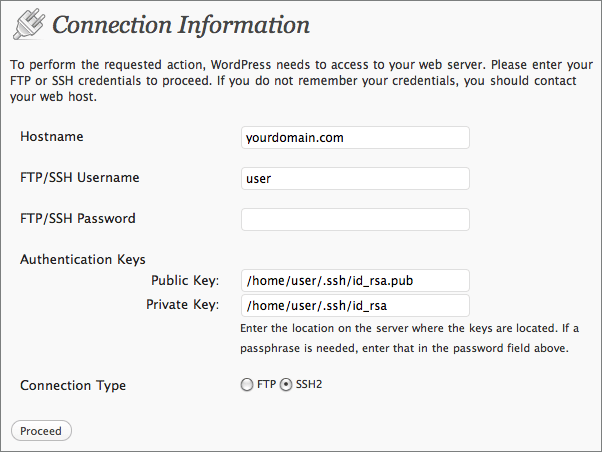
Now, when you log into the WordPress admin dashboard and perform an action that requires a file transfer operation, such as installing or updating a plugin, you should be presented with more options for the connection type. Aside from FTP, which was there before, you should also have SSH2. Select SSH2 and it will add a few fields to the form and it should look something like the screenshot below.
Important:
The FTP/SSH Username here is the user name for SSH for which you created the ssh keys earlier, NOT your ftp user. And the password is the passphrase that you created during the key generation step earlier, not the users password.

To avoid having to enter this information every time a file transfer is executed you can define a few constants in your WordPress configuration file wp-config.php:
1 2 3 4 5 | |
Important: Be sure to move your wp-config.php file out of the doc root for added security.
Troubleshooting
Pecl installation of ssh2 fails
Error
1 2 | |
Solution
Check if autoconf is on your system but not in the path:
1
| |
If it is there then
1
| |
Error
Pecl does not have write permissions to the tmp directories and fails with
1
| |
Solution
Temporarily change permissions on the following folders.
1 2 | |
Run the install again and then change the permissions back
1 2 | |
For getting this to work the first time for myself I referred to the following two posts:
http://hostechs.com/2008/07/installing-ssh2-for-php-shell-connections-how-to/ http://www.firesidemedia.net/dev/wordpress-install-upgrade-ssh/